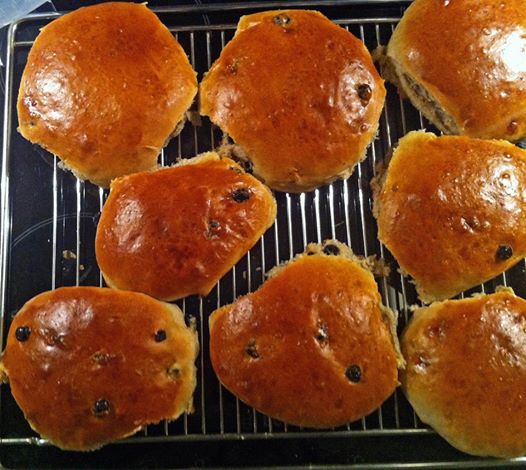
Just a note that I’ve blogged the teacakes baking process over here, if you’re interested. They’re heartily snakelet-approved (they’re 25cm across, and he ate about 0.75 of one on the plane?).
Meanwhile, the blog is slightly dark because I’m on a skiing holiday–return to hemi-semi-regularly content next week, I promise! I’ll try to do a post on my revisions process.
Just a heads-up that, following further experimentation, the muffins: a. turned out much better, and b. came from a much simpler recipe (in essence, bread, yeast, water and salt). I’ve posted the process online, if you’re interested.
And it’s recipe Wednesday again! Except we don’t exactly have recipes, but I figured it was time I did something for this part of the blog. So instead of recipes, we’re going to talk kitchen utensils today.
My idea of a shopping trip for kitchen utensils is Kawa, 89 rue de Choisy in the 13th District. Kawa sells to individuals, but the primary audience is for restaurant owners and cooks, and the kitchen stuff they sell is heavy duty indeed. In addition to crockery, they have woks, rice cookers, spatulas, etc. I got my (very handy) garlic press from them, and their spatulas and wok spatulas are way handier than anything I’ve seen in high-end cookshops (not to mention cheaper).
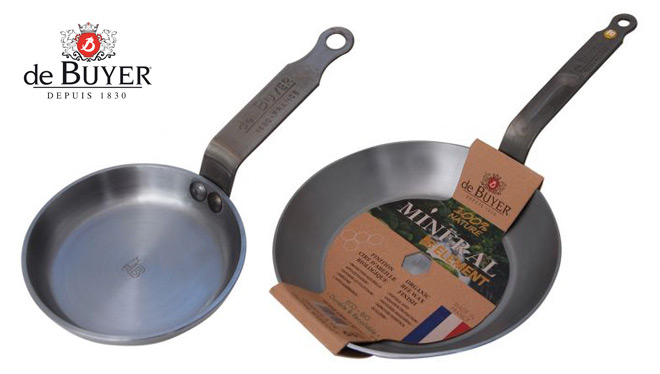
When I dropped by Kawa last time, I was in need of a frying pan to replace our nonstick one after its untimely death; and they had a whole row of carbon steel de Buyer pans.
I’ve never cooked with carbon steel, and all I’ve heard (mostly from cooking boards) made it sound really fiddly–which is a thing I don’t really do (fiddly and fragile are two things I handle badly in a kitchen), but I was also tired of having to replace a frying pan every few years when the teflon died on me. What the heck, I figured. They’re reasonably affordable, and if it doesn’t work out I can always change my mind next go-around.
Turns out I was needlessly worried. The pan is great: it’s a bit heavy (but not as heavy as cast-iron–the one cast-iron pan we do have, a big Le Creuset thing, I almost never use because it’s too much work getting it out onto the stove). It has to be seasoned first, which basically consists of heating up oil just below smoking point on it (the instructions come with the frying pan), and carefully wiping it dry. That’s the start of your patina, which is then developed further by cooking greasy things in it until the entire bottom of the pan turns black.
I found the pan seasoned pretty well: I’m not at the stage where I’ll cook an omelette with just a smidgeon of oil on it, but it’s noticeably slicker already, after just a few uses. Because it’s thin and it’s metal, it also heats up quite fast: it’s a great pan for searing meat. It’s not a pan for cooking without fat, or for frying anything fragile (like, whole fish is out); but for searing or omelettes or anything that requires high temps it’s superb (and because it seizes at truly high temps the meat tastes really good, too).
There’s a bunch of instructions on this that theoretically make it a hassle to handle: do not use an abrasive sponge on it, and clean it with very hot water (and rub with coarse salt if anything gets stuck to it); and dry it and oil it before putting it away. I have to admit neither the H nor I could be bothered to follow these, and the pan has still survived pretty well 🙂 We use a sponge with the green scratchy back, use a moderate amount of soap, and the seasoning has reasonably stuck around so far. For putting it away, I follow advice I’ve seen on the net for carbon steel woks, and dry the pan on a warm stove before putting it away (basically, you want to make sure there’s no humidity on the pan. It might be a problem not to oil it in warmer climes, but in our very dry kitchen it never was an issue).
And, best of all, this is a pan that lasts–no Tefal coating that can flake away, and I know families that still use the ones that belonged to grandmothers. It’s pretty cheap for that price (I got it for 30 euros with a slight discount, normally I think it’s 40). Just be careful: as with all frying pans, the diameter is the outer edge: we got a 24cm-omelet pan, but in reality, the cooking surface is closer to 21cm.
Would I recommend this? I’d definitely get at least one for the kitchen; and see if you like it. It’s a bit fiddly but well worth it.